Walls & Ceiling Plastered In Kitchen

Saturday 15 December 2012

Why Use Lime

Before the start of the 20th century the plastering techniques that were used differed greatly to those that are used today. The use of lime putty and lime plasters benefit a property in many ways

  • Lime based coverings are porous and allow the property to breathe
  • They allow for movement in the property
  • The possibility of cracks and splits is greatly reduced 
  • Adding a lime wash finish helps to disperse moisture from within the render
While lime mortars are porous, concrete and sand and cement are non-porous. Older buildings, in particular those made of brick and stone, need to breathe so that moisture can pass in and out of walls, maintaining their stability. The application of impermeable plasters and renders often means moisture can become trapped, often causing cracking and problems with damp and moulds. Because lime is porous, it balances the moisture content in the internal atmosphere within the building thus avoiding problems with condensation but also with the excessive dryness often associated with modern dry-lined buildings. Its breathability also means it is suitable for green/eco buildings and it has many environmental and health benefits.

                                               www.plastering4u.com

Monday 10 December 2012

Plastering Repairs Using Lime

When restoring any old house, whether it be a Victorian townhouse or a 17th century country cottage, you might come across limework when stripping off layers of modern paint and old wallpaper. Old crumbly lime may come off by accident or design, revealing stonework, brickwork or wooden laths. Whilst the experience may seem overwhelming, these areas can be repaired with lime if the right methods and materials are used. The golden rule here is patience; ripping off large areas of lime or pulling down lath ceilings is rarely necessary and may be extremely expensive and time consuming to put right!
A 17th century Georgian property in Margate, Kent is being elegantly restored; these photos show how a damaged lime ceiling was repaired using lime.


Saturday 8 December 2012

Great Project, Great Location

Here I built and rendered a block wall to help extend the patio area around the swimming pool. This also created storage area and inserted a steel door for access.


Monday 12 November 2012

Paved Driveway

In this project I was asked to stone pave a driveway:
1. On the first day the whole drive was cleared and concrete laid
2. When dry, I then laid the stones onto a sand/cement base
3. Finished off by pointing all the stones


Friday 9 November 2012

Block Tiled Floor

In this project I had to create a floor using old style block tiles in a herringbone pattern:
1. All the rubble was cleared and the area levelled
2. I put down a membrane before laying a concrete base
3. When dry, I began laying the block tiles onto a sand base (as shown in photo)
4. After all the blocks were laid and grouted I applied 2 coats of sealant oil


Monday 22 October 2012

Sundeck

This is how I created a tiled sundeck:
1) Built tiled steps for access
2) Rendered & painted the supporting wall facing the swimming pool
3) Screeded the base for the sundeck
4) Laid the floor tiles on the screeded base
5) Fitted the balustrade to enclose the sundeck


Monday 15 October 2012

Extended Kitchen

To extend the kitchen we had to knock thru the back wall, block up the arches by inserting a double glazed door and double glazed window. Also: (i) Rendered & painted the exterior walls (ii) Built tiled step and fixed skirting tiles


Tuesday 2 October 2012

Pebble-Dashed Front Of House

Parts of the pebble-dash coat on the front wall of this house had "blown". I repaired and re-pebble-dashed these damaged areas before the whole of the front of the house was painted.


Thursday 27 September 2012

Energy-Saving Home Improvements From The Green Deal

From 28th January 2013 homeowners and tenants will be able to make energy-saving improvements such as internal wall insulation (of exterior walls) systems, external wall insulation systems http://youtu.be/7yU7TN_g6uM at no upfront cost through the Green Deal. The list of 45 improvements that qualify for this support also includes installing solar panels, new boilers and insulated or heated wooden floors.
From 1st October accredited advisers, from energy companies to leading retailers and alternative energy providers, will be available to survey individual homes, assessing the most effective improvements for that property.
 The low-interest loan will be spread over periods of up to 25 years and collected via energy bills.
To qualify for the Green Deal finance the cost of any potential improvement will have to be matched by savings on energy bills. This is known as the "golden rule". So, if you want solar panels at a cost of £6,000 and the saving on bills is estimated at £6,000, over 10 years, then your repayments can be spread over that period. In theory, the improvement need not cost the homeowner anything.
Here's an example of internal wall insulation (of exterior walls) systems that we carried out:


Friday 21 September 2012

Making Your Home A Sound Investment

There are several ways to soundproof your walls & floors:
Many partition walls don't contain any insulation, so consider removing the plasterboard on one side and fitting acoustic insulation  wool between the studs before you replace the plasterboard. A slightly cheaper way is fitting a layer of sound-blocking plasterboard to a wall or ceiling, then plastering it. This really works well for brick dividing walls between terraced houses or flats.
To insulate floors, lift the boards and fit  acoustic insulation between the joists before you put the floorboards back down.
www.plastering4u.com

Monday 3 September 2012

External Wall Insulation Systems

Insulation render systems is a material that is growing in popularity in the UK. The product used in this project is ParexDPR super fine, it has great insulation qualities as well as being low maintenance and hard wearing. Before applying the material, the external plasterboard has a fibreglass mesh and plastic angle beads fitted. Then the backing coat is applied. When this coat is dry & hard, the final coat can be laid and "floated up" to give the final finish.


Friday 24 August 2012

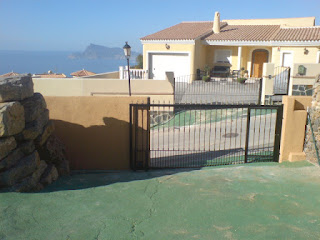
New Wall & Sliding Gate

At this stunning location with great views, I had to rebuild a wall and insert a new automated sliding gate.This is how I achieved it:
                  1. Rebuilt wall using concrete blocks
                  2. Rendered both sides of wall
                  3. Painted both sides
                  4. Laid new track for sliding gate
                  5. Inserted new sliding gate